Pages

vineri, 3 martie 2023

PyGame : simple web camera !

In this simple tutorial, I'll show you how to use pygame to use it with a webcam.
Let's install the pygame with the pip tool:
C:\PythonProjects\pygamecamera001>pip install pygame --user
Collecting pygame
  Downloading pygame-2.2.0-cp311-cp311-win_amd64.whl (10.4 MB)
     ---------------------------------------- 10.4/10.4 MB 9.0 MB/s eta 0:00:00
Installing collected packages: pygame
Successfully installed pygame-2.2.0
This is the source code for web camera:
import pygame.camera
import pygame.image
import sys

pygame.camera.init()

cameras = pygame.camera.list_cameras()

webcam = pygame.camera.Camera(cameras[0])

webcam.start()

img = webcam.get_image()

WIDTH = img.get_width()
HEIGHT = img.get_height()

screen = pygame.display.set_mode( ( WIDTH, HEIGHT ) )
pygame.display.set_caption("pyGame webcam")

while True :
    for e in pygame.event.get() :
        if e.type == pygame.QUIT :
            sys.exit()
    screen.blit(img, (0,0))
    pygame.display.flip()
    img = webcam.get_image()

luni, 2 ianuarie 2023

PyGame : simple digital clock.

This is the source code I used and is very simple.
import pygame
import time

# init the Pygame
pygame.init()

# this set the window size
window_size = (640, 100)

# this create the window
screen = pygame.display.set_mode(window_size)

# this set the title of the window
pygame.display.set_caption("Digital Clock")

# this fill the background color to white
screen.fill((255, 255, 255))

# settings for the font and size
font = pygame.font.Font(None, 36)

# the game loop area
running = True
while running:
# use an event to quit
    for event in pygame.event.get():
        if event.type == pygame.QUIT:
            running = False

    # get the current time
    current_time = time.strftime("%H:%M:%S")

    # render the time as text
    text = font.render(current_time, True, (0, 0, 0))

    # clear the screen
    screen.fill((255, 255, 255))

    # draw the text on the screen
    screen.blit(text, (10, 10))

    # update the screen
    pygame.display.flip()

# quit Pygame application
pygame.quit()
The result of the running source code is this:

joi, 22 decembrie 2022

News : pygame-menu version 4.3.2.

This python package let you to use a menu for pygame.
You can find it on this webpage and documentation on this webpage.
This is simple to use it:
You can install easy like any python package using the pip3 python tool:
pip3 install pygame-menu==4.3.2 --user
I created a python file named pygame-menu_001.py and I add this simple example to test it:
import pygame
import pygame_menu
from pygame_menu import Theme
pygame.init()
surface = pygame.display.set_mode((640, 480))

def set_difficulty(value, difficulty):
    # Do the job here !
    pass

def start_the_game():
    # Do the job here !
    pass

mytheme = pygame_menu.themes.THEME_BLUE.copy()
mytheme.title_background_color=(0, 19, 76)
mytheme = Theme(widget_font=pygame_menu.font.FONT_FRANCHISE)

menu = pygame_menu.Menu('Main menu', 400, 300,
                       theme=mytheme)

menu.add.text_input('User :', default='catafest')
menu.add.selector('Difficulty :', [('Hard', 1), ('Easy', 2)], onchange=set_difficulty)
menu.add.button('Play', start_the_game)
menu.add.button('Quit', pygame_menu.events.EXIT)

menu.mainloop(surface)
This is the result of the running script:

marți, 22 februarie 2022

PyGame : Testing Pygame GUI - part 03.

In this article tutorial I show you how can create a progressbar and set it with value 76.
This example looks like this:
The source code is not very complicated and is very readable for any developer with minimal knowledge in the programming area.
import pygame
import pygame_gui

pygame.init()

pygame.display.set_caption('Quick Start')
window_surface = pygame.display.set_mode((640, 480))

background = pygame.Surface((640, 480))
background.fill(pygame.Color('#0076AB'))

manager = pygame_gui.UIManager((640, 480))

print(dir(pygame_gui.elements.UIProgressBar))
myProgressBar = pygame_gui.elements.UIProgressBar(relative_rect=pygame.Rect((50, 100), (300, 40)),
	visible= 1,
        manager=manager)
myProgressBar.set_current_progress(76)
clock = pygame.time.Clock()
is_running = True

while is_running:
    time_delta = clock.tick(60)/1000.0
    for event in pygame.event.get():
        if event.type == pygame.QUIT:
            is_running = False

        if event.type == pygame_gui.UI_BUTTON_PRESSED:
            if event.ui_element == hello_button:
                print('Hello World!')

        manager.process_events(event)

    manager.update(time_delta)

    window_surface.blit(background, (0, 0))
    manager.draw_ui(window_surface)

    pygame.display.update()

duminică, 20 februarie 2022

PyGame : Testing Pygame GUI - part 02.

I repeat, Pygame GUI is a module to help you make graphical user interfaces for games written in pygame.
In this short tutorial I will show you a source code that creates a HealthBar.
This example looks like this:
The source code is not very complicated and is very readable.
import pygame
import pygame_gui

pygame.init()

pygame.display.set_caption('Quick Start')
window_surface = pygame.display.set_mode((640, 480))

background = pygame.Surface((640, 480))
background.fill(pygame.Color('#0076AB'))

manager = pygame_gui.UIManager((640, 480))

HealthBar = pygame_gui.elements.UIScreenSpaceHealthBar(relative_rect=pygame.Rect((50, 100), (300, 40)),
	visible= 1,
        manager=manager)
clock = pygame.time.Clock()
is_running = True

while is_running:
    time_delta = clock.tick(60)/1000.0
    for event in pygame.event.get():
        if event.type == pygame.QUIT:
            is_running = False

        if event.type == pygame_gui.UI_BUTTON_PRESSED:
            if event.ui_element == hello_button:
                print('Hello World!')

        manager.process_events(event)

    manager.update(time_delta)

    window_surface.blit(background, (0, 0))
    manager.draw_ui(window_surface)

    pygame.display.update()

vineri, 11 februarie 2022

PyGame : Testing Pygame GUI - part 01.

Pygame GUI is a module to help you make graphical user interfaces for games written in pygame.
The module is firmly forward-looking and is designed to work on Pygame 2 and Python 3.
You can read more about these features for this python package on the official website.
This is a simple interface with python and python pygame and pygame_gui python packages.
You can see a simple example on my GitHub account.

duminică, 16 ianuarie 2022

PyGame : How to use Box2D python package - part 002.

I've written a tutorial in the past about the python package called box2d, see this tutorial.
Today I will be more precise and I will show you a source code related to 2D simulation.
I installed the python package in the Fedora 35 Linux distribution with the DNF tool:
[root@fedora mythcat]# dnf search pybox2d
...
python3-pybox2d.x86_64 : A 2D rigid body simulation library for Python
[root@fedora mythcat]# dnf install python3-pybox2d.x86_64
Last metadata expiration check: 0:18:37 ago on Sun 16 Jan 2022 10:15:43 AM EET.
Dependencies resolved.
...
Installed:
  python3-pybox2d-2.3.2-17.fc35.x86_64                                          

Complete!
I created the working folders and the first python file named example001.py:
[mythcat@fedora ~]$ mkdir PyGameProjects
[mythcat@fedora ~]$ cd PyGameProjects/
[mythcat@fedora PyGameProjects]$ touch example001.py
[mythcat@fedora PyGameProjects]$ vi example001.py
It contains a default source code:
from Box2D import (b2PolygonShape, b2World)
# create word 
world = b2World()  
# set the world 
groundBody = world.CreateStaticBody(position=(0, -10),
                                    shapes=b2PolygonShape(box=(50, 10)),
                                    )
# create a dynamic body at position
body = world.CreateDynamicBody(position=(0, 4))

# add and set a box fixture onto it with a nonzero density, so it will move
box = body.CreatePolygonFixture(box=(1, 1), density=1, friction=0.3)

# use a time step of 1/60 of a second
timeStep = 1.0 / 60

# simulation scenario with 6 velocity/2 position iterations
vel_iters, pos_iters = 6, 2

# the game loop.
for i in range(60):
    # use step of simulation
    world.Step(timeStep, vel_iters, pos_iters)

    # clear body forces even I didn't apply any forces
    world.ClearForces()

    # print the position and angle of the body.
    print(body.position, body.angle)
The result of the run looks like this:
...
b2Vec2(1.8719e-08,1.01496) 6.208252216310939e-06
b2Vec2(1.90152e-08,1.01497) 4.9494738050270826e-06
For a more complex example we created two python files.
One is a class for a box and a file that calls the class.
The first file contains the following source code is named box.py:
import pygame
from Box2D import (b2EdgeShape, b2FixtureDef, b2PolygonShape, b2_dynamicBody,
                   b2_kinematicBody, b2_staticBody, b2World)

class Box:
    def __init__(self, x, y, l, world):
        self.x = x / l
        self.y = y / l
        self.w = .2
        self.h = .2

        self.world = world
        self.attachment = self.world.CreateDynamicBody(
            position=(self.x, self.y),
            fixtures=b2FixtureDef(
                shape=b2PolygonShape(box=(self.w, self.h)), density=0.4, friction = 0.4),)
                
    def display(self, screen):
        for body in self.world.bodies:
            for fixture in body.fixtures:
                shape = fixture.shape
                vertices = [(body.transform * v) * 20 for v in shape.vertices]
                pygame.draw.polygon(screen, 'azure', vertices)
                pygame.draw.polygon(screen, 'blue', vertices,width=3)
The file calling the class has the following source code:
import pygame
from box import Box
from Box2D import b2World

l = 20
fps = 60
frame_rate = 1.0 / fps

pygame.init()
screen = pygame.display.set_mode((640, 480))
pygame.display.set_caption("Physics")
clock = pygame.time.Clock()

# A list for all of our rectangles
list_boxes = []
world = b2World(gravity=(0, 9.8), doSleep=False)

close = False

while not close:
    
    for event in pygame.event.get():
        if event.type == pygame.QUIT:
            close = True
    
    screen.fill('white')

    click, _, _ = pygame.mouse.get_pressed()    
    if click == 1:
        x,y = pygame.mouse.get_pos()
        box = Box(x, y, l, world)
        list_boxes.append(box)

    for box in list_boxes:
        box.display(screen)

    world.Step(frame_rate, 10, 10)
    pygame.display.flip()
    clock.tick(fps)

pygame.quit()
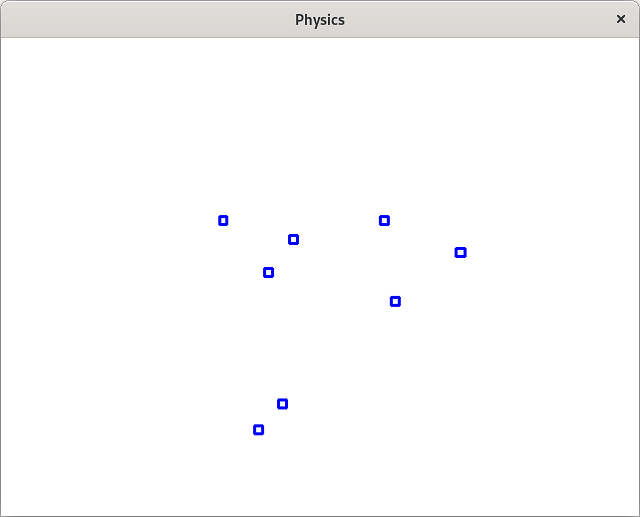
The result of running this file looks like this screenshot with some squares moving to the bottom: