Pages

joi, 22 decembrie 2022

News : pygame-menu version 4.3.2.

This python package let you to use a menu for pygame.
You can find it on this webpage and documentation on this webpage.
This is simple to use it:
You can install easy like any python package using the pip3 python tool:
pip3 install pygame-menu==4.3.2 --user
I created a python file named pygame-menu_001.py and I add this simple example to test it:
import pygame
import pygame_menu
from pygame_menu import Theme
pygame.init()
surface = pygame.display.set_mode((640, 480))

def set_difficulty(value, difficulty):
    # Do the job here !
    pass

def start_the_game():
    # Do the job here !
    pass

mytheme = pygame_menu.themes.THEME_BLUE.copy()
mytheme.title_background_color=(0, 19, 76)
mytheme = Theme(widget_font=pygame_menu.font.FONT_FRANCHISE)

menu = pygame_menu.Menu('Main menu', 400, 300,
                       theme=mytheme)

menu.add.text_input('User :', default='catafest')
menu.add.selector('Difficulty :', [('Hard', 1), ('Easy', 2)], onchange=set_difficulty)
menu.add.button('Play', start_the_game)
menu.add.button('Quit', pygame_menu.events.EXIT)

menu.mainloop(surface)
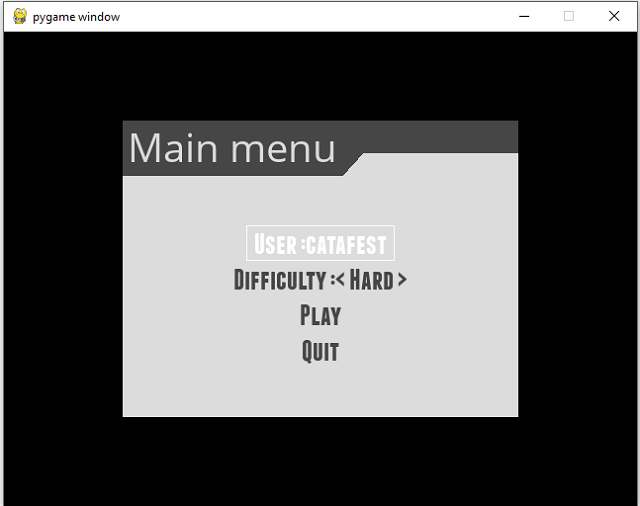
This is the result of the running script:

marți, 22 februarie 2022

PyGame : Testing Pygame GUI - part 03.

In this article tutorial I show you how can create a progressbar and set it with value 76.
This example looks like this:
The source code is not very complicated and is very readable for any developer with minimal knowledge in the programming area.
import pygame
import pygame_gui

pygame.init()

pygame.display.set_caption('Quick Start')
window_surface = pygame.display.set_mode((640, 480))

background = pygame.Surface((640, 480))
background.fill(pygame.Color('#0076AB'))

manager = pygame_gui.UIManager((640, 480))

print(dir(pygame_gui.elements.UIProgressBar))
myProgressBar = pygame_gui.elements.UIProgressBar(relative_rect=pygame.Rect((50, 100), (300, 40)),
	visible= 1,
        manager=manager)
myProgressBar.set_current_progress(76)
clock = pygame.time.Clock()
is_running = True

while is_running:
    time_delta = clock.tick(60)/1000.0
    for event in pygame.event.get():
        if event.type == pygame.QUIT:
            is_running = False

        if event.type == pygame_gui.UI_BUTTON_PRESSED:
            if event.ui_element == hello_button:
                print('Hello World!')

        manager.process_events(event)

    manager.update(time_delta)

    window_surface.blit(background, (0, 0))
    manager.draw_ui(window_surface)

    pygame.display.update()

duminică, 20 februarie 2022

PyGame : Testing Pygame GUI - part 02.

I repeat, Pygame GUI is a module to help you make graphical user interfaces for games written in pygame.
In this short tutorial I will show you a source code that creates a HealthBar.
This example looks like this:
The source code is not very complicated and is very readable.
import pygame
import pygame_gui

pygame.init()

pygame.display.set_caption('Quick Start')
window_surface = pygame.display.set_mode((640, 480))

background = pygame.Surface((640, 480))
background.fill(pygame.Color('#0076AB'))

manager = pygame_gui.UIManager((640, 480))

HealthBar = pygame_gui.elements.UIScreenSpaceHealthBar(relative_rect=pygame.Rect((50, 100), (300, 40)),
	visible= 1,
        manager=manager)
clock = pygame.time.Clock()
is_running = True

while is_running:
    time_delta = clock.tick(60)/1000.0
    for event in pygame.event.get():
        if event.type == pygame.QUIT:
            is_running = False

        if event.type == pygame_gui.UI_BUTTON_PRESSED:
            if event.ui_element == hello_button:
                print('Hello World!')

        manager.process_events(event)

    manager.update(time_delta)

    window_surface.blit(background, (0, 0))
    manager.draw_ui(window_surface)

    pygame.display.update()

vineri, 11 februarie 2022

PyGame : Testing Pygame GUI - part 01.

Pygame GUI is a module to help you make graphical user interfaces for games written in pygame.
The module is firmly forward-looking and is designed to work on Pygame 2 and Python 3.
You can read more about these features for this python package on the official website.
This is a simple interface with python and python pygame and pygame_gui python packages.
You can see a simple example on my GitHub account.

duminică, 16 ianuarie 2022

PyGame : How to use Box2D python package - part 002.

I've written a tutorial in the past about the python package called box2d, see this tutorial.
Today I will be more precise and I will show you a source code related to 2D simulation.
I installed the python package in the Fedora 35 Linux distribution with the DNF tool:
[root@fedora mythcat]# dnf search pybox2d
...
python3-pybox2d.x86_64 : A 2D rigid body simulation library for Python
[root@fedora mythcat]# dnf install python3-pybox2d.x86_64
Last metadata expiration check: 0:18:37 ago on Sun 16 Jan 2022 10:15:43 AM EET.
Dependencies resolved.
...
Installed:
  python3-pybox2d-2.3.2-17.fc35.x86_64                                          

Complete!
I created the working folders and the first python file named example001.py:
[mythcat@fedora ~]$ mkdir PyGameProjects
[mythcat@fedora ~]$ cd PyGameProjects/
[mythcat@fedora PyGameProjects]$ touch example001.py
[mythcat@fedora PyGameProjects]$ vi example001.py
It contains a default source code:
from Box2D import (b2PolygonShape, b2World)
# create word 
world = b2World()  
# set the world 
groundBody = world.CreateStaticBody(position=(0, -10),
                                    shapes=b2PolygonShape(box=(50, 10)),
                                    )
# create a dynamic body at position
body = world.CreateDynamicBody(position=(0, 4))

# add and set a box fixture onto it with a nonzero density, so it will move
box = body.CreatePolygonFixture(box=(1, 1), density=1, friction=0.3)

# use a time step of 1/60 of a second
timeStep = 1.0 / 60

# simulation scenario with 6 velocity/2 position iterations
vel_iters, pos_iters = 6, 2

# the game loop.
for i in range(60):
    # use step of simulation
    world.Step(timeStep, vel_iters, pos_iters)

    # clear body forces even I didn't apply any forces
    world.ClearForces()

    # print the position and angle of the body.
    print(body.position, body.angle)
The result of the run looks like this:
...
b2Vec2(1.8719e-08,1.01496) 6.208252216310939e-06
b2Vec2(1.90152e-08,1.01497) 4.9494738050270826e-06
For a more complex example we created two python files.
One is a class for a box and a file that calls the class.
The first file contains the following source code is named box.py:
import pygame
from Box2D import (b2EdgeShape, b2FixtureDef, b2PolygonShape, b2_dynamicBody,
                   b2_kinematicBody, b2_staticBody, b2World)

class Box:
    def __init__(self, x, y, l, world):
        self.x = x / l
        self.y = y / l
        self.w = .2
        self.h = .2

        self.world = world
        self.attachment = self.world.CreateDynamicBody(
            position=(self.x, self.y),
            fixtures=b2FixtureDef(
                shape=b2PolygonShape(box=(self.w, self.h)), density=0.4, friction = 0.4),)
                
    def display(self, screen):
        for body in self.world.bodies:
            for fixture in body.fixtures:
                shape = fixture.shape
                vertices = [(body.transform * v) * 20 for v in shape.vertices]
                pygame.draw.polygon(screen, 'azure', vertices)
                pygame.draw.polygon(screen, 'blue', vertices,width=3)
The file calling the class has the following source code:
import pygame
from box import Box
from Box2D import b2World

l = 20
fps = 60
frame_rate = 1.0 / fps

pygame.init()
screen = pygame.display.set_mode((640, 480))
pygame.display.set_caption("Physics")
clock = pygame.time.Clock()

# A list for all of our rectangles
list_boxes = []
world = b2World(gravity=(0, 9.8), doSleep=False)

close = False

while not close:
    
    for event in pygame.event.get():
        if event.type == pygame.QUIT:
            close = True
    
    screen.fill('white')

    click, _, _ = pygame.mouse.get_pressed()    
    if click == 1:
        x,y = pygame.mouse.get_pos()
        box = Box(x, y, l, world)
        list_boxes.append(box)

    for box in list_boxes:
        box.display(screen)

    world.Step(frame_rate, 10, 10)
    pygame.display.flip()
    clock.tick(fps)

pygame.quit()
The result of running this file looks like this screenshot with some squares moving to the bottom:
duminică, 9 ianuarie 2022

PyGame : Pygame New Years Jams 2022.

I haven't written about this python package in a long time because I was busy with other solutions of everyday life, but here it should continue with new elements this year ...
If you want to create a simple game, make some graphics or learn very quickly the basics of programming, then I recommend python with pygame.
First of all, the syntax of the programming language is simple and allows you to focus on the programming side, and the implementation of the graphics is just as simple.
It seems that there are users and tendencies to bring to our attention the possibilities of this python package.
Since December 26, the well-known website itch.io come with Pygame New Years Jam.
All submissions was open from December 26th 2021 at 11:00 AM to January 2nd 2022 at 11:00 AM
I did not know this fact but you can find examples to download and test.
For this jam the submission is closed and voting is now in progress.
NOW same website comes with another Winter 2022.
You can find the rules on this webpage.
You may use any game engine to make your game and build for any platform you like, including mobile. For mobile, only APKs can be distributed on itch.io.
You can see more at this web page.