... seams pygame team development works and released a new version, see the GitHub project.
Se afișează postările cu eticheta pygame. Afișați toate postările
Se afișează postările cu eticheta pygame. Afișați toate postările
marți, 23 septembrie 2025
sâmbătă, 19 octombrie 2024
PyGame : 5by5 linux game project - part 001.
The game is about your brain skills to hack the code based on minimal information versus total information.

The code has 5 distinct letters.
- click on the letters on the keypad
- the number of guessed letters is displayed in the form: centered - guessed letters on positions and moved guessed letters but on other positions
I used agentpy python module and pygame python module
The game can be found on my fedora pagure account.
sâmbătă, 21 septembrie 2024
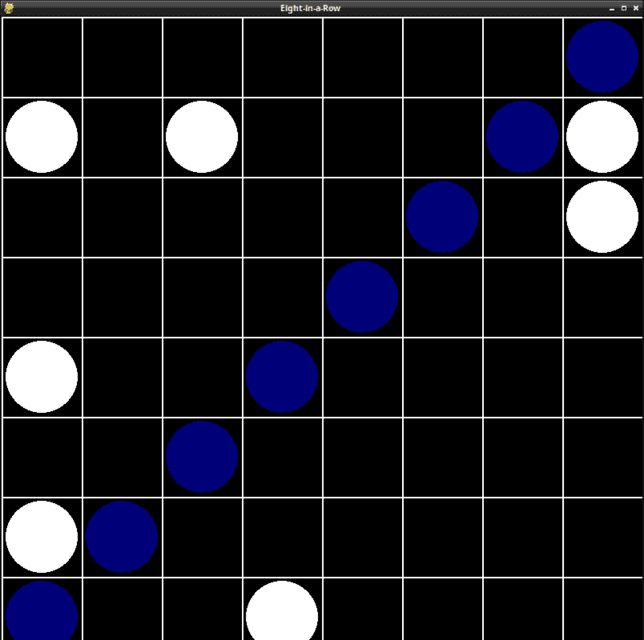
PyGame : 8in8 linux game project - part 001.
I started a game project with the python packages pygame and agentpy in the Fedora Linux distribution.
You can find it on my fedora pagure repo
duminică, 16 iunie 2024
PyGame : Game development in PyGame: making a basic map.
Example with PyGame with 3D features ...
The project can be found on the GitHub repo - stage 11 ...
sâmbătă, 30 martie 2024
PyGame : ... antialiased filled circle !
The pygame python module does not implement an antialiased filled circle and this is the scope of this tutorial.
The pygame module for drawing shapes are:
- pygame.draw.rect - to draw a rectangle
- pygame.draw.polygon - to draw a polygon
- pygame.draw.circle - to draw a circle
- pygame.draw.ellipse - to draw an ellipse
- pygame.draw.arc - to draw an elliptical arc
- pygame.draw.line - to draw a straight line
- pygame.draw.lines - to draw multiple contiguous straight line segments
- pygame.draw.aaline - to draw a straight antialiased line
- pygame.draw.aalines - to draw multiple contiguous straight antialiased line segments.
Let's install pygame python module.
pip install pygame
Collecting pygame
  Downloading pygame-2.5.2-cp312-cp312-win_amd64.whl.metadata (13 kB)
...
Installing collected packages: pygame
Successfully installed pygame-2.5.2
Let's see the source code:
import pygame
import pygame.gfxdraw

TARGET_SIZE = 200
BG_ALPHA_COLOR = (0, 0, 0, 100)

class Target(pygame.sprite.Sprite):
    def __init__(self):
        super().__init__()
        self.image = pygame.Surface((TARGET_SIZE, TARGET_SIZE), pygame.SRCALPHA)
        self.rect = self.image.get_rect()
        self.color = (255, 0, 0)
        self.filled = False
        self.width = 1

    def DrawTarget(self):
        pygame.gfxdraw.aacircle(self.image, int(self.rect.width/2), int(self.rect.height/2),\
                int(self.rect.width/2 - 1), self.color)

        pygame.gfxdraw.filled_ellipse(self.image, int(self.rect.width/2), \
            int(self.rect.height/2), int(self.rect.width/2 - 1), int(self.rect.width/2 - 1), self.color)

        temp = pygame.Surface((TARGET_SIZE, TARGET_SIZE), pygame.SRCALPHA)

        if not self.filled:
            pygame.gfxdraw.filled_ellipse(temp, int(self.rect.width/2), int(self.rect.height/2), \
                int(self.rect.width/2 - self.width), int(self.rect.width/2 - self.width), BG_ALPHA_COLOR)
            pygame.gfxdraw.aacircle(temp, int(self.rect.width/2), int(self.rect.height/2), \
                int(self.rect.width/2 - self.width), BG_ALPHA_COLOR)

        self.image.blit(temp, (0, 0), None, pygame.BLEND_ADD)
pygame.init()
screen = pygame.display.set_mode((400, 400))

target = Target()
target.DrawTarget()

running = True
while running:
    for event in pygame.event.get():
        if event.type == pygame.QUIT:
            running = False

    screen.fill((255, 255, 255))
    screen.blit(target.image, (100, 100))
    pygame.display.flip()

pygame.quit()sâmbătă, 8 aprilie 2023
PyGame : ovoid with a random pattern.
Here's how to create an ovoid with a random pattern. Run the script several times to see the differences:
import pygame
import random
pygame.init()

# Set up the display window
screen_size = (400, 400)
screen = pygame.display.set_mode(screen_size)
# Set window title
pygame.display.set_caption("Ovoid with Random Pattern")
# Define the ovoid
ovoid_pos = (150, 100)
ovoid_size = (100, 200)

# Create the ovoid surface
ovoid_surface = pygame.Surface(ovoid_size, pygame.SRCALPHA)

# Define the pattern
pattern_size = (random.randint(1, 9), random.randint(1, 9))
pattern_surface = pygame.Surface(pattern_size)
pattern_surface.fill((255, 255, 255))
pygame.draw.line(pattern_surface, (0, 0, 0), (0, 0), pattern_size)

# Create the mask surface
mask_surface = pygame.Surface(ovoid_size, pygame.SRCALPHA)
pygame.draw.ellipse(mask_surface, (255, 255, 255), mask_surface.get_rect(), 0)

# Apply the pattern to the ovoid surface
for x in range(0, ovoid_size[0], pattern_size[0]):
    for y in range(0, ovoid_size[1], pattern_size[1]):
        ovoid_surface.blit(pattern_surface, (x, y))

# Apply the mask to the ovoid surface
ovoid_surface.blit(mask_surface, (0, 0), special_flags=pygame.BLEND_RGBA_MULT)

# Draw the ovoid to the screen
screen.blit(ovoid_surface, ovoid_pos)

# Update the display
pygame.display.flip()

# Wait for the user to close the window
done = False
while not done:
    for event in pygame.event.get():
        if event.type == pygame.QUIT:
            done = True

# Quit pygame properly
pygame.quit()vineri, 3 martie 2023
PyGame : simple web camera !
In this simple tutorial, I'll show you how to use pygame to use it with a webcam.
Let's install the pygame with the pip tool:
C:\PythonProjects\pygamecamera001>pip install pygame --user
Collecting pygame
  Downloading pygame-2.2.0-cp311-cp311-win_amd64.whl (10.4 MB)
     ---------------------------------------- 10.4/10.4 MB 9.0 MB/s eta 0:00:00
Installing collected packages: pygame
Successfully installed pygame-2.2.0
This is the source code for web camera:
import pygame.camera
import pygame.image
import sys

pygame.camera.init()

cameras = pygame.camera.list_cameras()

webcam = pygame.camera.Camera(cameras[0])

webcam.start()

img = webcam.get_image()

WIDTH = img.get_width()
HEIGHT = img.get_height()

screen = pygame.display.set_mode( ( WIDTH, HEIGHT ) )
pygame.display.set_caption("pyGame webcam")

while True :
    for e in pygame.event.get() :
        if e.type == pygame.QUIT :
            sys.exit()
    screen.blit(img, (0,0))
    pygame.display.flip()
    img = webcam.get_image()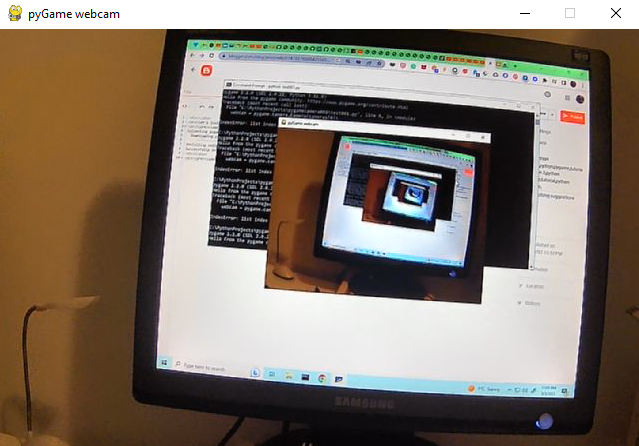
luni, 2 ianuarie 2023
PyGame : simple digital clock.
This is the source code I used and is very simple.
import pygame
import time

# init the Pygame
pygame.init()

# this set the window size
window_size = (640, 100)

# this create the window
screen = pygame.display.set_mode(window_size)

# this set the title of the window
pygame.display.set_caption("Digital Clock")

# this fill the background color to white
screen.fill((255, 255, 255))

# settings for the font and size
font = pygame.font.Font(None, 36)

# the game loop area
running = True
while running:
# use an event to quit
    for event in pygame.event.get():
        if event.type == pygame.QUIT:
            running = False

    # get the current time
    current_time = time.strftime("%H:%M:%S")

    # render the time as text
    text = font.render(current_time, True, (0, 0, 0))

    # clear the screen
    screen.fill((255, 255, 255))

    # draw the text on the screen
    screen.blit(text, (10, 10))

    # update the screen
    pygame.display.flip()

# quit Pygame application
pygame.quit()
The result of the running source code is this:

marți, 22 februarie 2022
PyGame : Testing Pygame GUI - part 03.
In this article tutorial I show you how can create a progressbar and set it with value 76.
This example looks like this:

The source code is not very complicated and is very readable for any developer with minimal knowledge in the programming area.
import pygame
import pygame_gui

pygame.init()

pygame.display.set_caption('Quick Start')
window_surface = pygame.display.set_mode((640, 480))

background = pygame.Surface((640, 480))
background.fill(pygame.Color('#0076AB'))

manager = pygame_gui.UIManager((640, 480))

print(dir(pygame_gui.elements.UIProgressBar))
myProgressBar = pygame_gui.elements.UIProgressBar(relative_rect=pygame.Rect((50, 100), (300, 40)),
	visible= 1,
        manager=manager)
myProgressBar.set_current_progress(76)
clock = pygame.time.Clock()
is_running = True

while is_running:
    time_delta = clock.tick(60)/1000.0
    for event in pygame.event.get():
        if event.type == pygame.QUIT:
            is_running = False

        if event.type == pygame_gui.UI_BUTTON_PRESSED:
            if event.ui_element == hello_button:
                print('Hello World!')

        manager.process_events(event)

    manager.update(time_delta)

    window_surface.blit(background, (0, 0))
    manager.draw_ui(window_surface)

pygame.display.update()duminică, 20 februarie 2022
PyGame : Testing Pygame GUI - part 02.
I repeat, Pygame GUI is a module to help you make graphical user interfaces for games written in pygame.
In this short tutorial I will show you a source code that creates a HealthBar.
This example looks like this:

The source code is not very complicated and is very readable.
import pygame
import pygame_gui

pygame.init()

pygame.display.set_caption('Quick Start')
window_surface = pygame.display.set_mode((640, 480))

background = pygame.Surface((640, 480))
background.fill(pygame.Color('#0076AB'))

manager = pygame_gui.UIManager((640, 480))

HealthBar = pygame_gui.elements.UIScreenSpaceHealthBar(relative_rect=pygame.Rect((50, 100), (300, 40)),
	visible= 1,
        manager=manager)
clock = pygame.time.Clock()
is_running = True

while is_running:
    time_delta = clock.tick(60)/1000.0
    for event in pygame.event.get():
        if event.type == pygame.QUIT:
            is_running = False

        if event.type == pygame_gui.UI_BUTTON_PRESSED:
            if event.ui_element == hello_button:
                print('Hello World!')

        manager.process_events(event)

    manager.update(time_delta)

    window_surface.blit(background, (0, 0))
    manager.draw_ui(window_surface)

pygame.display.update()vineri, 11 februarie 2022
PyGame : Testing Pygame GUI - part 01.
Pygame GUI is a module to help you make graphical user interfaces for games written in pygame.
The module is firmly forward-looking and is designed to work on Pygame 2 and Python 3.
You can read more about these features for this python package on the official website.
This is a simple interface with python and python pygame and pygame_gui python packages.
You can see a simple example on my GitHub account.
duminică, 16 ianuarie 2022
PyGame : How to use Box2D python package - part 002.
I've written a tutorial in the past about the python package called box2d, see this tutorial.
Today I will be more precise and I will show you a source code related to 2D simulation.
I installed the python package in the Fedora 35 Linux distribution with the DNF tool:
[root@fedora mythcat]# dnf search pybox2d
...
python3-pybox2d.x86_64 : A 2D rigid body simulation library for Python
[root@fedora mythcat]# dnf install python3-pybox2d.x86_64
Last metadata expiration check: 0:18:37 ago on Sun 16 Jan 2022 10:15:43 AM EET.
Dependencies resolved.
...
Installed:
  python3-pybox2d-2.3.2-17.fc35.x86_64

Complete!
I created the working folders and the first python file named example001.py:
[mythcat@fedora ~]$ mkdir PyGameProjects
[mythcat@fedora ~]$ cd PyGameProjects/
[mythcat@fedora PyGameProjects]$ touch example001.py
[mythcat@fedora PyGameProjects]$ vi example001.py
It contains a default source code:
from Box2D import (b2PolygonShape, b2World)
# create word
world = b2World()
# set the world
groundBody = world.CreateStaticBody(position=(0, -10),
                                    shapes=b2PolygonShape(box=(50, 10)),
                                    )
# create a dynamic body at position
body = world.CreateDynamicBody(position=(0, 4))

# add and set a box fixture onto it with a nonzero density, so it will move
box = body.CreatePolygonFixture(box=(1, 1), density=1, friction=0.3)

# use a time step of 1/60 of a second
timeStep = 1.0 / 60

# simulation scenario with 6 velocity/2 position iterations
vel_iters, pos_iters = 6, 2

# the game loop.
for i in range(60):
    # use step of simulation
    world.Step(timeStep, vel_iters, pos_iters)

    # clear body forces even I didn't apply any forces
    world.ClearForces()

    # print the position and angle of the body.
    print(body.position, body.angle)
The result of the run looks like this:
...
b2Vec2(1.8719e-08,1.01496) 6.208252216310939e-06
b2Vec2(1.90152e-08,1.01497) 4.9494738050270826e-06
For a more complex example we created two python files.
One is a class for a box and a file that calls the class.
The first file contains the following source code is named box.py:
import pygame
from Box2D import (b2EdgeShape, b2FixtureDef, b2PolygonShape, b2_dynamicBody,
                   b2_kinematicBody, b2_staticBody, b2World)

class Box:
    def __init__(self, x, y, l, world):
        self.x = x / l
        self.y = y / l
        self.w = .2
        self.h = .2

        self.world = world
        self.attachment = self.world.CreateDynamicBody(
            position=(self.x, self.y),
            fixtures=b2FixtureDef(
                shape=b2PolygonShape(box=(self.w, self.h)), density=0.4, friction = 0.4),)

    def display(self, screen):
        for body in self.world.bodies:
            for fixture in body.fixtures:
                shape = fixture.shape
                vertices = [(body.transform * v) * 20 for v in shape.vertices]
                pygame.draw.polygon(screen, 'azure', vertices)
                pygame.draw.polygon(screen, 'blue', vertices,width=3)
The file calling the class has the following source code:
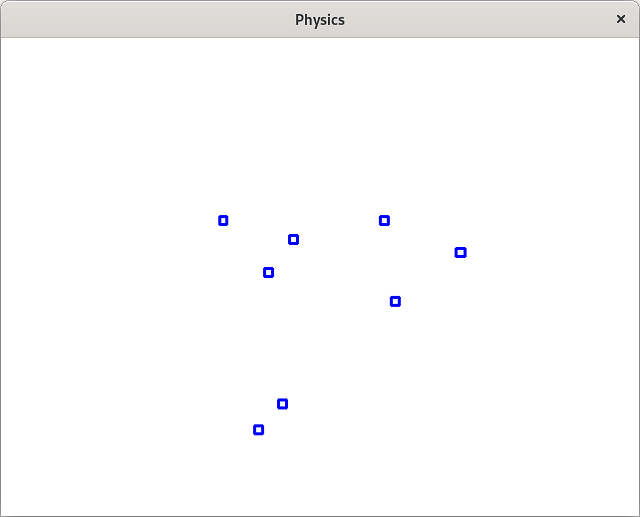
import pygame
from box import Box
from Box2D import b2World

l = 20
fps = 60
frame_rate = 1.0 / fps

pygame.init()
screen = pygame.display.set_mode((640, 480))
pygame.display.set_caption("Physics")
clock = pygame.time.Clock()

# A list for all of our rectangles
list_boxes = []
world = b2World(gravity=(0, 9.8), doSleep=False)

close = False

while not close:

    for event in pygame.event.get():
        if event.type == pygame.QUIT:
            close = True

    screen.fill('white')

    click, _, _ = pygame.mouse.get_pressed()
    if click == 1:
        x,y = pygame.mouse.get_pos()
        box = Box(x, y, l, world)
        list_boxes.append(box)

    for box in list_boxes:
        box.display(screen)

    world.Step(frame_rate, 10, 10)
    pygame.display.flip()
    clock.tick(fps)

pygame.quit()
The result of running this file looks like this screenshot with some squares moving to the bottom:
duminică, 9 ianuarie 2022
PyGame : Pygame New Years Jams 2022.
I haven't written about this python package in a long time because I was busy with other solutions of everyday life, but here it should continue with new elements this year ...
If you want to create a simple game, make some graphics or learn very quickly the basics of programming, then I recommend python with pygame.
First of all, the syntax of the programming language is simple and allows you to focus on the programming side, and the implementation of the graphics is just as simple.
It seems that there are users and tendencies to bring to our attention the possibilities of this python package.
Since December 26, the well-known website itch.io come with Pygame New Years Jam.
All submissions was open from December 26th 2021 at 11:00 AM to January 2nd 2022 at 11:00 AM
I did not know this fact but you can find examples to download and test.
For this jam the submission is closed and voting is now in progress.
NOW same website comes with another Winter 2022.
You can find the rules on this webpage.
You may use any game engine to make your game and build for any platform you like, including mobile. For mobile, only APKs can be distributed on itch.io.
You can see more at this web page.
sâmbătă, 7 noiembrie 2020
PyGame : Install pygame 2.0 from GitHub on Linux.
Let's install all Fedora packages need for this python package:
[root@desk pygame]# dnf install SDL2-devel.x86_64
...
Installed:
  SDL2-devel-2.0.12-4.fc33.x86_64

Complete!
[root@desk pygame]# dnf install SDL2_ttf-devel.x86_64
...
Installed:
  SDL2_ttf-2.0.15-6.fc33.x86_64       SDL2_ttf-devel-2.0.15-6.fc33.x86_64

Complete!
[root@desk pygame]# dnf install SDL2_image-devel.x86_64
...
Installed:
  SDL2_image-2.0.5-5.fc33.x86_64      SDL2_image-devel-2.0.5-5.fc33.x86_64

Complete!
[root@desk pygame]# dnf install SDL2_mixer-devel.x86_64
...
Installed:
  SDL2_mixer-2.0.4-7.fc33.x86_64      SDL2_mixer-devel-2.0.4-7.fc33.x86_64

Complete!
[root@desk pygame]# dnf install SDL2_gfx-devel.x86_64
...
Installed:
  SDL2_gfx-1.0.4-3.fc33.x86_64        SDL2_gfx-devel-1.0.4-3.fc33.x86_64

Complete!
[root@desk pygame]# dnf install portmidi-devel.x86_64
...
Installed:
  portmidi-devel-217-38.fc33.x86_64

Complete![mythcat@desk ~]$ git clone https://github.com/pygame/pygame
Cloning into 'pygame'...
remote: Enumerating objects: 4, done.
remote: Counting objects: 100% (4/4), done.
remote: Compressing objects: 100% (4/4), done.
remote: Total 38509 (delta 0), reused 0 (delta 0), pack-reused 38505
Receiving objects: 100% (38509/38509), 17.78 MiB | 11.66 MiB/s, done.
Resolving deltas: 100% (29718/29718), done.
[mythcat@desk ~]$ cd pygame/
[mythcat@desk pygame]$ python3.9 setup.py install --user
WARNING, No "Setup" File Exists, Running "buildconfig/config.py"
Using UNIX configuration...
Hunting dependencies...
SDL : found 2.0.12
FONT : found
IMAGE : found
MIXER : found
PNG : found
JPEG : found
SCRAP : found
PORTMIDI: found
PORTTIME: found
FREETYPE: found 23.4.17
If you get compiler errors during install, double-check
the compiler flags in the "Setup" file.
...
copying docs/pygame_tiny.gif -> build/bdist.linux-x86_64/egg/pygame/docs
creating build/bdist.linux-x86_64/egg/EGG-INFO
copying pygame.egg-info/PKG-INFO -> build/bdist.linux-x86_64/egg/EGG-INFO
copying pygame.egg-info/SOURCES.txt -> build/bdist.linux-x86_64/egg/EGG-INFO
copying pygame.egg-info/dependency_links.txt -> build/bdist.linux-x86_64/egg/EGG-INFO
copying pygame.egg-info/entry_points.txt -> build/bdist.linux-x86_64/egg/EGG-INFO
copying pygame.egg-info/not-zip-safe -> build/bdist.linux-x86_64/egg/EGG-INFO
copying pygame.egg-info/top_level.txt -> build/bdist.linux-x86_64/egg/EGG-INFO
writing build/bdist.linux-x86_64/egg/EGG-INFO/native_libs.txt
creating dist
creating 'dist/pygame-2.0.1.dev1-py3.9-linux-x86_64.egg' and adding 'build/bdist.linux-x86_64/egg' to it
removing 'build/bdist.linux-x86_64/egg' (and everything under it)
Processing pygame-2.0.1.dev1-py3.9-linux-x86_64.egg
creating /home/mythcat/.local/lib/python3.9/site-packages/pygame-2.0.1.dev1-py3.9-linux-x86_64.egg
Extracting pygame-2.0.1.dev1-py3.9-linux-x86_64.egg to /home/mythcat/.local/lib/python3.9/site-packages
Adding pygame 2.0.1.dev1 to easy-install.pth file
Installed /home/mythcat/.local/lib/python3.9/site-packages/pygame-2.0.1.dev1-py3.9-linux-x86_64.egg
Processing dependencies for pygame==2.0.1.dev1
Finished processing dependencies for pygame==2.0.1.dev1[mythcat@desk pygame]$ ls
build dist examples README.rst setup.cfg src_c test
buildconfig docs pygame.egg-info Setup setup.py src_py
[mythcat@desk pygame]$ python3.9
Python 3.9.0 (default, Oct 6 2020, 00:00:00)
[GCC 10.2.1 20200826 (Red Hat 10.2.1-3)] on linux
Type "help", "copyright", "credits" or "license" for more information.
>>> import pygame
pygame 2.0.1.dev1 (SDL 2.0.12, python 3.9.0)
Hello from the pygame community. https://www.pygame.org/contribute.html
>>>
PyGame : The new pygame 2.0 .
A few days ago PyGame celebrated the anniversary of this python module ...
The 28th of October 2020 is the pygame 2.0 release date because pygame turns 20 years of age.
Here's what we find for pygame on GitHub.
Here are some of the 3306 changes...
The 28th of October 2020 is the pygame 2.0 release date because pygame turns 20 years of age.
Here's what we find for pygame on GitHub.
Here are some of the 3306 changes...
- Support for Metal, Direct 3d, Vulkan, OpenGL 3.0+ in various profiles (core, compatibility, debug, robust, etc), OpenGL ES, and other modern hardware-accelerated video APIs across many platforms.
- SSE2/Neon assembly image drawing. Much faster drawing routines, image loading, and alpha blending.
- Type Hints, for code completion (and to help you make the squiggly lines disappear) in editors and IDEs.
- Code cleanup, using lots of code robustness tools like static analyzers, and automated CI/CD. We've been able to help dozens of people new to community projects contribute. We have lots of work to go on code quality, but we're currently the highest rated Python and highest rate C large project on LGTM.
- Many, many bug fixes including in our pygame.draw routines, pygame.math(for vectors), and pygame.mask for pixel-perfect collision detection.
- better support for PyPy (the fast JIT based implementation of python). See our milestone
- Are we pypy yet? No. for our progress on making PyPy the best python for games.
- libsdl version 2 support. Technically pygame 2.0 still works with SDL 1, but we recommend SDL2 which is vastly improved over SDL1 for most use cases. Probably we will remove SDL 1 support starting pygame 2.1.
- Touch support (multitouch, gestures, etc)
- Audio input support (make games with your microphone!).
- Message alert boxes (Press OK, or Cancel).
- Better keyboard support. Proper Unicode input and IME support.
- Much improved game controller support.
- Better image and audio format support. Including webp, 32bit Wav files, and much more reliable mp3 support.
- Multiple display support, and multiple window support (multi-window support is still experimental, more will come in pygame 2.1).
- Android support through python for android (a fork of pygame subset for android). Better documentation and better support will come in future releases.
- to make distributing your apps easier, a built-in "pyinstaller hook" and compatibility with cxfreeze.
- binary "wheels" on many platforms and versions of python from the old python 2.7 - to the latest python 3.9 (and with pypy!).
- lots of quality of life improvements like
Surface.fill('black')instead ofSurface.fill(pygame.Color(0, 0, 0)). Also, keywords are supported by many more function arguments. You can draw rounded corners on rects. - plenty of new examples, like, and
python3 -m pygame.examples.music_drop_fade. Additionally, the example source code has been cleaned up a lot to follow a more current python style. - Hundreds of documentation improvements include a new Korean tutorial.
- a special SCALED mode that takes low pixel games and automatically translates them to a larger window. Imagine your 320x200 resolution game of glorious pixel art... on modern screens that would be a very tiny window. Now with SCALED, it shows up big on a Full HD screen, or even a 4K/8K screen and the translation of mouse coordinates and up-scaling of pixels is done for you (hardware accelerated of course).
sâmbătă, 4 iulie 2020
PyGame : Positional axes - part 005.
The goal of this tutorial is to use python classes, inheritance, and draw positional axes for rectangles.
I used two simple python scripts to solve these issues.
This python script named testing_axes.py I create two classes named Point_XY and Columns_XY:

import random
#
class Point_XY:
    def __init__(self):
        self.x = random.randrange(400)
        self.y = random.randrange(400)
        self.dx = random.randrange(50)+10
        self.dy = random.randrange(50)+10

    def __repr__(self):
        return "" % (self.x, self.y)

    def __str__(self):
        return "From str method of Point_XY: a is %s, b is %s" % (self.x, self.y)
#
class Columns_XY(Point_XY):
    def __init__(self):
        column = []
        p = Point_XY()
        self.column = (p.x, p.y, p.dx, p.dy)
        print(column)

    def __repr__(self,p):
        return "" % (self.column)

    def __str__(self):
        return "From str method of Columns_XY :%s>" % (self.column)
'''
if __name__ == "__main__":
    Columns_XY()
    pass
''' import sys
import pygame
from pygame.locals import *
from testing_axes import *
# define a square for each column
squares = []
# create column position x,y and rect size dx, dy
def create_columns_rect(n):
for i in range(n):
col = Columns_XY()
#print(col.column)
squares.append(col.column)
#print(squares)
return squares
def main():
# init PyGame
pygame.init()
# set size of screen
size_screen = (640,480)
# create display
screen_display = pygame.display.set_mode(size_screen,0,32)
# set color white
color_white = (255,255,255)
# set color blue
color_blue = (0,0,255)
# fill screen with a white color
screen_display.fill(color_white)
# set the numar of columns
nr_col = 5
# create columns from classes
cols = create_columns_rect(nr_col)
# use each column
for (px,py,dx,dy) in cols:
# print positions and size of rectangle
print (px,py,dx,dy)
# draw column rectangle to display with color and position and size
# screen_display , color_blue , px,py,dx,dy
pygame.draw.rect(screen_display,color_blue,(px,py,dx,dy))
# create a color for axes
color_col = (random.randrange(255),random.randrange(255),random.randrange(255))
# draw axes for x and y with the color
pygame.draw.line(screen_display, color_col, ( px , 0) , ( px , py + dy) )
pygame.draw.line(screen_display, color_col, ( 0 , py) , ( px + dx , py) )
# is workings get events
while True:
for event in pygame.event.get():
if event.type==QUIT:
pygame.quit()
sys.exit()
pygame.display.update()
# run main
if __name__ == "__main__":
main()
passduminică, 24 mai 2020
PyGame : Effects - part 004.
This is an simple example about how can be use palette colors.
This effect was used in the old game development.
The base of this python script is the Surface.
If you read the documentation then you can see this:
pygame object for representing images
Surface((width, height), flags=0, depth=0, masks=None) -> Surface
Surface((width, height), flags=0, Surface) -> Surface
In this example I used a new_color to change one color.
Let's see the example:
#!/usr/bin/python
import sys
import pygame
from pygame.locals import *

pygame.init()
pygame.display.set_caption('swap color pallete')
screen = pygame.display.set_mode((640,480),0,32)

clock = pygame.time.Clock()

test_image = pygame.image.load('test.png').convert()
image_back = test_image.copy()
def palette_swap(img_surface, old_color, new_color):

    img_copy = pygame.Surface(test_image.get_size())
    img_copy.fill(new_color)
    img_surface.set_colorkey(old_color)
    img_copy.blit(img_surface,(0,0))
    return img_copy

test_image = palette_swap(test_image, (210,0,1), (0,0,255))
test_image = palette_swap(test_image, (154, 209, 59), (205, 124, 97))
test_image.set_colorkey((0,0,0))

while True:
    screen.fill((0,0,0))
    screen.blit(pygame.transform.scale(test_image,(test_image.get_width()*2,
                                                   test_image.get_height() * 2)), (0,0))
    screen.blit(pygame.transform.scale(image_back,(image_back.get_width()*2,
                                                   image_back.get_height() * 2)), (256,0))
    for event in pygame.event.get():
        if event.type == QUIT:
            sys.exit()
        if event.type == KEYDOWN:
            if event.key == K_ESCAPE:
                pygame.quit()
                sys.exit()
    pygame.display.update()
    clock.tick(60)
    # print the fps , time amd tick for this pygame test
    #print(clock.get_fps(), clock.get_time(),clock.tick())
The test.png is a simple png file image with the size of 128 x 128 pixels.
This is the output of this simple example:

sâmbătă, 28 decembrie 2019
PyGame : Game pygame-medic-snake.
I made this game because I had a broken tooth and now I haven't found a dentist for the holidays.
Until I get the pain or I get to the dentist I started writing this game.
The game is simple to use and comes today with version 0.0.1.
See the full source code at my GitHub account.
Until I get the pain or I get to the dentist I started writing this game.
The game is simple to use and comes today with version 0.0.1.
See the full source code at my GitHub account.
joi, 26 decembrie 2019
PyGame : How to use Box2D python package - part 001.
About this python package the official GitHub comes with this intro:
pybox2d is a 2D physics library for your games and simple simulations. It's based on the Box2D library, written in C++. It supports several shape types (circle, polygon, thin line segments), and quite a few joint types (revolute, prismatic, wheel, etc.).
In the first step, you need to install the swig Fedora package.
About swig the official webpage tells us:
SWIG is an interface compiler that connects programs written in C and C++ with scripting languages such as Perl, Python, Ruby, and Tcl. It works by taking the declarations found in C/C++ header files and using them to generate the wrapper code that scripting languages need to access the underlying C/C++ code. In addition, SWIG provides a variety of customization features that let you tailor the wrapping process to suit your application.
I install it with DNF tool:

... and for the second one:

pybox2d is a 2D physics library for your games and simple simulations. It's based on the Box2D library, written in C++. It supports several shape types (circle, polygon, thin line segments), and quite a few joint types (revolute, prismatic, wheel, etc.).
In the first step, you need to install the swig Fedora package.
About swig the official webpage tells us:
SWIG is an interface compiler that connects programs written in C and C++ with scripting languages such as Perl, Python, Ruby, and Tcl. It works by taking the declarations found in C/C++ header files and using them to generate the wrapper code that scripting languages need to access the underlying C/C++ code. In addition, SWIG provides a variety of customization features that let you tailor the wrapping process to suit your application.
I install it with DNF tool:
[root@desk mythcat]# dnf install swig.x86_64
Last metadata expiration check: 0:00:43 ago on Thu 26 Dec 2019 10:40:53 PM EET.
Dependencies resolved.
====================================================================================
 Package         Architecture      Version                 Repository          Size
====================================================================================
Installing:
 swig            x86_64            4.0.1-3.fc31            updates            1.4 M

Transaction Summary
====================================================================================
Install  1 Package

Total download size: 1.4 M
Installed size: 5.7 M
Is this ok [y/N]: y
Downloading Packages:
swig-4.0.1-3.fc31.x86_64.rpm                        1.7 MB/s | 1.4 MB     00:00
------------------------------------------------------------------------------------
Total                                               863 kB/s | 1.4 MB     00:01
Running transaction check
Transaction check succeeded.
Running transaction test
Transaction test succeeded.
Running transaction
  Preparing        :                                                            1/1
  Installing       : swig-4.0.1-3.fc31.x86_64                                   1/1
  Running scriptlet: swig-4.0.1-3.fc31.x86_64                                   1/1
  Verifying        : swig-4.0.1-3.fc31.x86_64                                   1/1

Installed:
  swig-4.0.1-3.fc31.x86_64

Complete![mythcat@desk ~]$ git clone https://github.com/pybox2d/pybox2d
Cloning into 'pybox2d'...
remote: Enumerating objects: 2922, done.
remote: Total 2922 (delta 0), reused 0 (delta 0), pack-reused 2922
Receiving objects: 100% (2922/2922), 9.12 MiB | 4.04 MiB/s, done.
Resolving deltas: 100% (1832/1832), done.
[mythcat@desk ~]$ cd pybox2d/
[mythcat@desk pybox2d]$ python setup.py clean
Using setuptools (version 41.2.0).
running clean
[mythcat@desk pybox2d]$ python setup.py build
Using setuptools (version 41.2.0).
running build
running build_py
creating build
creating build/lib.linux-x86_64-3.7
creating build/lib.linux-x86_64-3.7/Box2D
...
[mythcat@desk pybox2d]$ python setup.py install --user
Using setuptools (version 41.2.0).
running install
running bdist_egg
running egg_info
...
Processing dependencies for Box2D==2.3.2
Finished processing dependencies for Box2D==2.3.2[mythcat@desk ~]$ python3 simple_01.py
pygame 1.9.6
Hello from the pygame community. https://www.pygame.org/contribute.html
Done!
[mythcat@desk ~]$ python3 simple_02.py
pygame 1.9.6
Hello from the pygame community. https://www.pygame.org/contribute.html
Done!... and for the second one:
sâmbătă, 21 decembrie 2019
PyGame : Install and test pygame on Fedora 31 distro.
The install of the python package named pygame on Fedora Linux distro is very simple with the pip3 tool for python 3 version.
[mythcat@desk ~]$ pip3 install pygame --user
Collecting pygame
...
Installing collected packages: pygame
Successfully installed pygame-1.9.6[mythcat@desk ~]$ python3
Python 3.7.5 (default, Dec 15 2019, 17:54:26)
[GCC 9.2.1 20190827 (Red Hat 9.2.1-1)] on linux
Type "help", "copyright", "credits" or "license" for more information.
>>> import pygame
pygame 1.9.6
Hello from the pygame community. https://www.pygame.org/contribute.html
>>> from pygame import *
>>> print(pygame.__version__)
1.9.6
>>> dir(pygame)
['ACTIVEEVENT', 'ANYFORMAT', 'ASYNCBLIT', 'AUDIODEVICEADDED', 'AUDIODEVICEREMOVED',
'AUDIO_ALLOW_ANY_CHANGE', 'AUDIO_ALLOW_CHANNELS_CHANGE', 'AUDIO_ALLOW_FORMAT_CHANGE',
'AUDIO_ALLOW_FREQUENCY_CHANGE', 'AUDIO_S16', 'AUDIO_S16LSB', 'AUDIO_S16MSB', 'AUDIO_S16SYS',
'AUDIO_S8', 'AUDIO_U16', 'AUDIO_U16LSB', 'AUDIO_U16MSB', 'AUDIO_U16SYS', 'AUDIO_U8',
'BIG_ENDIAN', 'BLEND_ADD', 'BLEND_MAX', 'BLEND_MIN', 'BLEND_MULT', 'BLEND_PREMULTIPLIED', 'BLEND_RGBA_ADD',
'BLEND_RGBA_MAX', 'BLEND_RGBA_MIN', 'BLEND_RGBA_MULT', 'BLEND_RGBA_SUB', 'BLEND_RGB_ADD', 'BLEND_RGB_MAX',
'BLEND_RGB_MIN', 'BLEND_RGB_MULT', 'BLEND_RGB_SUB', 'BLEND_SUB', 'BUTTON_LEFT', 'BUTTON_MIDDLE', 'BUTTON_RIGHT',
'BUTTON_WHEELDOWN', 'BUTTON_WHEELUP', 'BUTTON_X1', 'BUTTON_X2', 'BufferError', 'BufferProxy', 'Color',
'DOUBLEBUF', 'DROPBEGIN', 'DROPCOMPLETE', 'DROPFILE', 'DROPTEXT', 'FINGERDOWN', 'FINGERMOTION', 'FINGERUP',
'FULLSCREEN', 'GL_ACCELERATED_VISUAL', 'GL_ACCUM_ALPHA_SIZE', 'GL_ACCUM_BLUE_SIZE', 'GL_ACCUM_GREEN_SIZE',
'GL_ACCUM_RED_SIZE', 'GL_ALPHA_SIZE', 'GL_BLUE_SIZE', 'GL_BUFFER_SIZE', 'GL_DEPTH_SIZE', 'GL_DOUBLEBUFFER',
'GL_GREEN_SIZE', 'GL_MULTISAMPLEBUFFERS', 'GL_MULTISAMPLESAMPLES', 'GL_RED_SIZE', 'GL_STENCIL_SIZE', 'GL_STEREO',
'GL_SWAP_CONTROL', 'HAT_CENTERED', 'HAT_DOWN', 'HAT_LEFT', 'HAT_LEFTDOWN', 'HAT_LEFTUP', 'HAT_RIGHT',
'HAT_RIGHTDOWN', 'HAT_RIGHTUP', 'HAT_UP', 'HAVE_NEWBUF', 'HWACCEL', 'HWPALETTE', 'HWSURFACE', 'IYUV_OVERLAY',
'JOYAXISMOTION', 'JOYBALLMOTION', 'JOYBUTTONDOWN', 'JOYBUTTONUP', 'JOYHATMOTION', 'KEYDOWN', 'KEYUP', 'KMOD_ALT',
'KMOD_CAPS', 'KMOD_CTRL', 'KMOD_LALT', 'KMOD_LCTRL', 'KMOD_LMETA', 'KMOD_LSHIFT', 'KMOD_META', 'KMOD_MODE',
'KMOD_NONE', 'KMOD_NUM', 'KMOD_RALT', 'KMOD_RCTRL', 'KMOD_RMETA', 'KMOD_RSHIFT', 'KMOD_SHIFT', 'K_0', 'K_1',
'K_2', 'K_3', 'K_4', 'K_5', 'K_6', 'K_7', 'K_8', 'K_9', 'K_AMPERSAND', 'K_ASTERISK', 'K_AT', 'K_BACKQUOTE',
'K_BACKSLASH', 'K_BACKSPACE', 'K_BREAK', 'K_CAPSLOCK', 'K_CARET', 'K_CLEAR', 'K_COLON', 'K_COMMA', 'K_DELETE',
'K_DOLLAR', 'K_DOWN', 'K_END', 'K_EQUALS', 'K_ESCAPE', 'K_EURO', 'K_EXCLAIM', 'K_F1', 'K_F10', 'K_F11', 'K_F12',
'K_F13', 'K_F14', 'K_F15', 'K_F2', 'K_F3', 'K_F4', 'K_F5', 'K_F6', 'K_F7', 'K_F8', 'K_F9', 'K_FIRST', 'K_GREATER',
'K_HASH', 'K_HELP', 'K_HOME', 'K_INSERT', 'K_KP0', 'K_KP1', 'K_KP2', 'K_KP3', 'K_KP4', 'K_KP5', 'K_KP6', 'K_KP7',
'K_KP8', 'K_KP9', 'K_KP_DIVIDE', 'K_KP_ENTER', 'K_KP_EQUALS', 'K_KP_MINUS', 'K_KP_MULTIPLY', 'K_KP_PERIOD',
'K_KP_PLUS', 'K_LALT', 'K_LAST', 'K_LCTRL', 'K_LEFT', 'K_LEFTBRACKET', 'K_LEFTPAREN', 'K_LESS', 'K_LMETA',
'K_LSHIFT', 'K_LSUPER', 'K_MENU', 'K_MINUS', 'K_MODE', 'K_NUMLOCK', 'K_PAGEDOWN', 'K_PAGEUP', 'K_PAUSE',
'K_PERIOD', 'K_PLUS', 'K_POWER', 'K_PRINT', 'K_QUESTION', 'K_QUOTE', 'K_QUOTEDBL', 'K_RALT', 'K_RCTRL',
'K_RETURN', 'K_RIGHT', 'K_RIGHTBRACKET', 'K_RIGHTPAREN', 'K_RMETA', 'K_RSHIFT', 'K_RSUPER', 'K_SCROLLOCK',
'K_SEMICOLON', 'K_SLASH', 'K_SPACE', 'K_SYSREQ', 'K_TAB', 'K_UNDERSCORE', 'K_UNKNOWN', 'K_UP', 'K_a', 'K_b',
'K_c', 'K_d', 'K_e', 'K_f', 'K_g', 'K_h', 'K_i', 'K_j', 'K_k', 'K_l', 'K_m', 'K_n', 'K_o', 'K_p', 'K_q',
'K_r', 'K_s', 'K_t', 'K_u', 'K_v', 'K_w', 'K_x', 'K_y', 'K_z', 'LIL_ENDIAN', 'MOUSEBUTTONDOWN', 'MOUSEBUTTONUP',
'MOUSEMOTION', 'MOUSEWHEEL', 'MULTIGESTURE', 'Mask', 'NOEVENT', 'NOFRAME', 'NUMEVENTS', 'OPENGL', 'OPENGLBLIT',
'Overlay', 'PREALLOC', 'PixelArray', 'PygameVersion', 'QUIT', 'RESIZABLE', 'RLEACCEL', 'RLEACCELOK', 'Rect',
'SCRAP_BMP', 'SCRAP_CLIPBOARD', 'SCRAP_PBM', 'SCRAP_PPM', 'SCRAP_SELECTION', 'SCRAP_TEXT', 'SRCALPHA',
'SRCCOLORKEY', 'SWSURFACE', 'SYSWMEVENT', 'Surface', 'SurfaceType', 'TEXTEDITING', 'TEXTINPUT',
'TIMER_RESOLUTION', 'USEREVENT', 'USEREVENT_DROPFILE', 'UYVY_OVERLAY', 'VIDEOEXPOSE', 'VIDEORESIZE',
'Vector2', 'Vector3', 'WINDOWEVENT', 'WINDOWEVENT_CLOSE', 'YUY2_OVERLAY', 'YV12_OVERLAY', 'YVYU_OVERLAY',
'__builtins__', '__cached__', '__color_constructor','__color_reduce', '__doc__', '__file__', '__loader__',
'__name__', '__package__', '__path__', '__rect_constructor', '__rect_reduce', '__spec__', '__version__',
'_numpysndarray', '_numpysurfarray', 'base', 'bufferproxy', 'cdrom', 'color', 'colordict', 'compat',
'constants', 'cursors', 'display', 'draw', 'encode_file_path', 'encode_string', 'error', 'event', 'fastevent',
'font', 'get_array_interface', 'get_error', 'get_init', 'get_sdl_byteorder', 'get_sdl_version', 'image',
'init', 'joystick', 'key', 'mask', 'math', 'mixer', 'mixer_music', 'mouse', 'movie', 'overlay',
'packager_imports','pixelarray', 'pixelcopy', 'quit', 'rect', 'register_quit', 'rev', 'rwobject',
'scrap', 'segfault', 'set_error', 'sndarray', 'sprite', 'surface', 'surfarray', 'sysfont', 'threads',
'time', 'transform', 'ver', 'vernum', 'version', 'warn_unwanted_files']
Abonați-vă la:
Comentarii (Atom)