Pages

luni, 10 iulie 2023

News : About my work and one of my websites.

I would like to bring to the attention of those who follow my activity on my websites and appreciate the inability to continue with one of the websites: free-tutorials.org. It is currently hosted on a free host, but I cannot import it 100%, which has led me not to complete it with new posts. The continuation of the activities there, considering the limited time, will be carried out on my blogs with the defined theme with which I started: Linux - Fedora, Graphics, Python, Pygame.
In the meantime, because the host is expensive and until now someone has helped me to host it on his server, it is possible to sell the domain: free-tutorials.org - I receive purchase offers at my personal Yahoo email address catafest@yahoo.com.
Minimum starting price 250 euros, because the domain is old from 2018.

sâmbătă, 8 aprilie 2023

PyGame : ovoid with a random pattern.

Here's how to create an ovoid with a random pattern. Run the script several times to see the differences:
import pygame
import random
pygame.init()

# Set up the display window
screen_size = (400, 400)
screen = pygame.display.set_mode(screen_size)
# Set window title
pygame.display.set_caption("Ovoid with Random Pattern")
# Define the ovoid
ovoid_pos = (150, 100)
ovoid_size = (100, 200)

# Create the ovoid surface
ovoid_surface = pygame.Surface(ovoid_size, pygame.SRCALPHA)

# Define the pattern
pattern_size = (random.randint(1, 9), random.randint(1, 9))
pattern_surface = pygame.Surface(pattern_size)
pattern_surface.fill((255, 255, 255))
pygame.draw.line(pattern_surface, (0, 0, 0), (0, 0), pattern_size)

# Create the mask surface
mask_surface = pygame.Surface(ovoid_size, pygame.SRCALPHA)
pygame.draw.ellipse(mask_surface, (255, 255, 255), mask_surface.get_rect(), 0)

# Apply the pattern to the ovoid surface
for x in range(0, ovoid_size[0], pattern_size[0]):
    for y in range(0, ovoid_size[1], pattern_size[1]):
        ovoid_surface.blit(pattern_surface, (x, y))

# Apply the mask to the ovoid surface
ovoid_surface.blit(mask_surface, (0, 0), special_flags=pygame.BLEND_RGBA_MULT)

# Draw the ovoid to the screen
screen.blit(ovoid_surface, ovoid_pos)

# Update the display
pygame.display.flip()

# Wait for the user to close the window
done = False
while not done:
    for event in pygame.event.get():
        if event.type == pygame.QUIT:
            done = True

# Quit pygame properly
pygame.quit()

vineri, 3 martie 2023

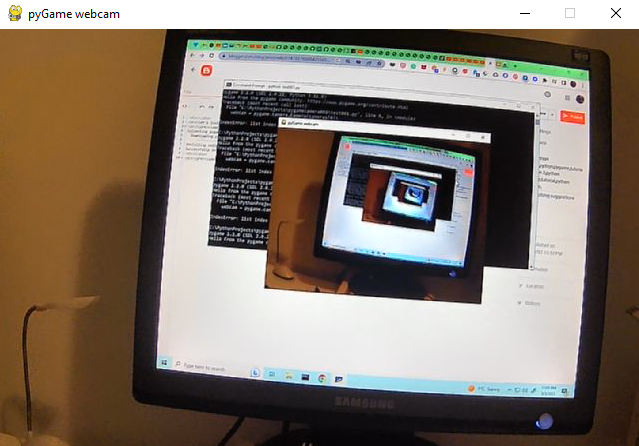
PyGame : simple web camera !

In this simple tutorial, I'll show you how to use pygame to use it with a webcam.
Let's install the pygame with the pip tool:
C:\PythonProjects\pygamecamera001>pip install pygame --user
Collecting pygame
  Downloading pygame-2.2.0-cp311-cp311-win_amd64.whl (10.4 MB)
     ---------------------------------------- 10.4/10.4 MB 9.0 MB/s eta 0:00:00
Installing collected packages: pygame
Successfully installed pygame-2.2.0
This is the source code for web camera:
import pygame.camera
import pygame.image
import sys

pygame.camera.init()

cameras = pygame.camera.list_cameras()

webcam = pygame.camera.Camera(cameras[0])

webcam.start()

img = webcam.get_image()

WIDTH = img.get_width()
HEIGHT = img.get_height()

screen = pygame.display.set_mode( ( WIDTH, HEIGHT ) )
pygame.display.set_caption("pyGame webcam")

while True :
    for e in pygame.event.get() :
        if e.type == pygame.QUIT :
            sys.exit()
    screen.blit(img, (0,0))
    pygame.display.flip()
    img = webcam.get_image()

luni, 2 ianuarie 2023

PyGame : simple digital clock.

This is the source code I used and is very simple.
import pygame
import time

# init the Pygame
pygame.init()

# this set the window size
window_size = (640, 100)

# this create the window
screen = pygame.display.set_mode(window_size)

# this set the title of the window
pygame.display.set_caption("Digital Clock")

# this fill the background color to white
screen.fill((255, 255, 255))

# settings for the font and size
font = pygame.font.Font(None, 36)

# the game loop area
running = True
while running:
# use an event to quit
    for event in pygame.event.get():
        if event.type == pygame.QUIT:
            running = False

    # get the current time
    current_time = time.strftime("%H:%M:%S")

    # render the time as text
    text = font.render(current_time, True, (0, 0, 0))

    # clear the screen
    screen.fill((255, 255, 255))

    # draw the text on the screen
    screen.blit(text, (10, 10))

    # update the screen
    pygame.display.flip()

# quit Pygame application
pygame.quit()
The result of the running source code is this:

joi, 22 decembrie 2022

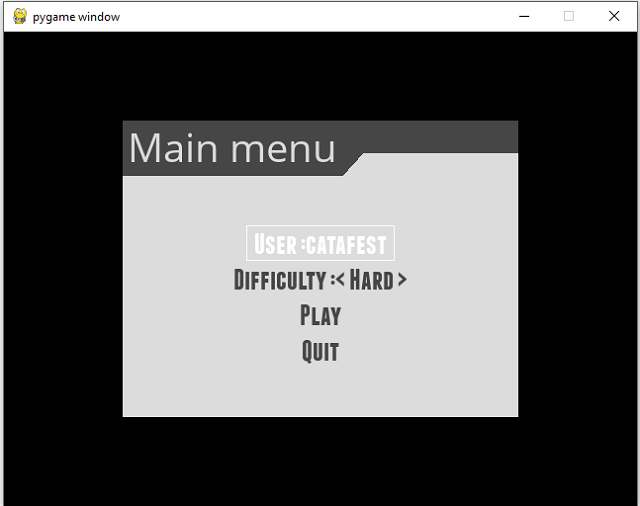
News : pygame-menu version 4.3.2.

This python package let you to use a menu for pygame.
You can find it on this webpage and documentation on this webpage.
This is simple to use it:
You can install easy like any python package using the pip3 python tool:
pip3 install pygame-menu==4.3.2 --user
I created a python file named pygame-menu_001.py and I add this simple example to test it:
import pygame
import pygame_menu
from pygame_menu import Theme
pygame.init()
surface = pygame.display.set_mode((640, 480))

def set_difficulty(value, difficulty):
    # Do the job here !
    pass

def start_the_game():
    # Do the job here !
    pass

mytheme = pygame_menu.themes.THEME_BLUE.copy()
mytheme.title_background_color=(0, 19, 76)
mytheme = Theme(widget_font=pygame_menu.font.FONT_FRANCHISE)

menu = pygame_menu.Menu('Main menu', 400, 300,
                       theme=mytheme)

menu.add.text_input('User :', default='catafest')
menu.add.selector('Difficulty :', [('Hard', 1), ('Easy', 2)], onchange=set_difficulty)
menu.add.button('Play', start_the_game)
menu.add.button('Quit', pygame_menu.events.EXIT)

menu.mainloop(surface)
This is the result of the running script:

marți, 22 februarie 2022

PyGame : Testing Pygame GUI - part 03.

In this article tutorial I show you how can create a progressbar and set it with value 76.
This example looks like this:
The source code is not very complicated and is very readable for any developer with minimal knowledge in the programming area.
import pygame
import pygame_gui

pygame.init()

pygame.display.set_caption('Quick Start')
window_surface = pygame.display.set_mode((640, 480))

background = pygame.Surface((640, 480))
background.fill(pygame.Color('#0076AB'))

manager = pygame_gui.UIManager((640, 480))

print(dir(pygame_gui.elements.UIProgressBar))
myProgressBar = pygame_gui.elements.UIProgressBar(relative_rect=pygame.Rect((50, 100), (300, 40)),
	visible= 1,
        manager=manager)
myProgressBar.set_current_progress(76)
clock = pygame.time.Clock()
is_running = True

while is_running:
    time_delta = clock.tick(60)/1000.0
    for event in pygame.event.get():
        if event.type == pygame.QUIT:
            is_running = False

        if event.type == pygame_gui.UI_BUTTON_PRESSED:
            if event.ui_element == hello_button:
                print('Hello World!')

        manager.process_events(event)

    manager.update(time_delta)

    window_surface.blit(background, (0, 0))
    manager.draw_ui(window_surface)

    pygame.display.update()

duminică, 20 februarie 2022

PyGame : Testing Pygame GUI - part 02.

I repeat, Pygame GUI is a module to help you make graphical user interfaces for games written in pygame.
In this short tutorial I will show you a source code that creates a HealthBar.
This example looks like this:
The source code is not very complicated and is very readable.
import pygame
import pygame_gui

pygame.init()

pygame.display.set_caption('Quick Start')
window_surface = pygame.display.set_mode((640, 480))

background = pygame.Surface((640, 480))
background.fill(pygame.Color('#0076AB'))

manager = pygame_gui.UIManager((640, 480))

HealthBar = pygame_gui.elements.UIScreenSpaceHealthBar(relative_rect=pygame.Rect((50, 100), (300, 40)),
	visible= 1,
        manager=manager)
clock = pygame.time.Clock()
is_running = True

while is_running:
    time_delta = clock.tick(60)/1000.0
    for event in pygame.event.get():
        if event.type == pygame.QUIT:
            is_running = False

        if event.type == pygame_gui.UI_BUTTON_PRESSED:
            if event.ui_element == hello_button:
                print('Hello World!')

        manager.process_events(event)

    manager.update(time_delta)

    window_surface.blit(background, (0, 0))
    manager.draw_ui(window_surface)

    pygame.display.update()